• Multiple Layouts, Powered by
    RokSprocket Read More
  • Versatile Core Framework
    Gantry 4 Read More
  • Advanced, CSS based, Responsive
    Dropdown Menu Read More
  • 1
  • 2
  • 3
image
ShowcaseFeatures
Showcase layout type for images / content.
image
Tabbed ItemsTabs
Display your content in dynamic tabs.
image
AccordionLists
Show content in static or dynamic lists.

Most Popular

  • Responsive Layout The layout adapts to mobile, tablet and desktop varying devices.
  • Two Menu Options Dropdown and SplitMenu, each with mobile support.
  • Multiple Styles An assortment of eight preset style variations.
  • 1
  • 2

Oculus for Joomla is a RocketTheme Joomla Template Club release featuring the revolutionary Gantry Joomla Template Framework. Gantry is a comprehensive set of building blocks that enable the rapid development and realization of a design into a flexible and powerful web platform template.

To configure the template, navigate to Extensions → Template Manager → rt_oculus. Mouseover the labels to view a description of each parameter.

The following is a guide that covers how to set up your new Oculus template on your Joomla! site. Here you can find an overview of the files included in the Oculus release and instructions on installing and activating the template in your Joomla! install.

Note: The Bundle Template is only necessary if the Gantry Library is not installed at /libraries/gantry directory.


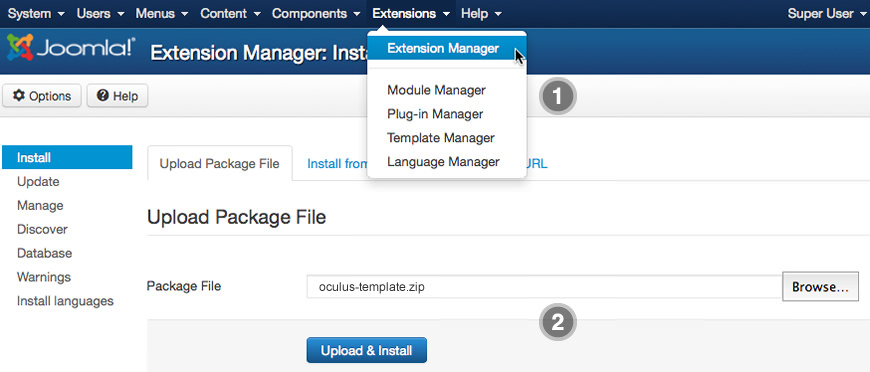
Step 1 - Installation

  1. Install from Admin → Extensions → Extensions Manager
  2. Browse for oculus-template.zip and click Upload & Install
Image

Image
 

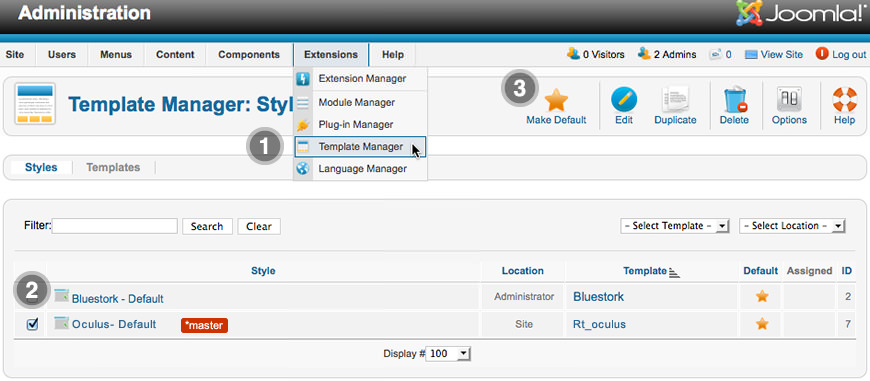
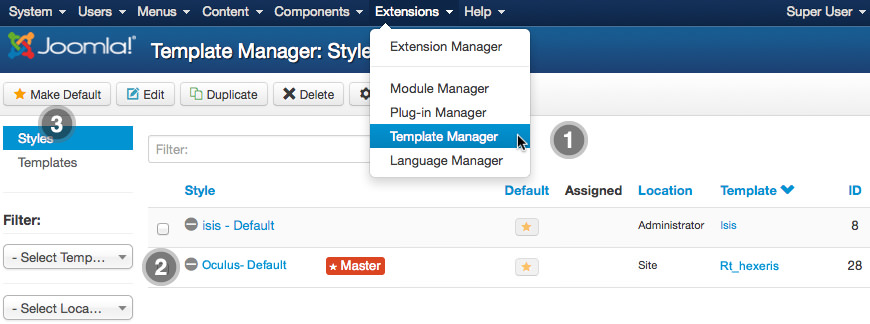
Step 2 - Template Default

  1. Make the template default at Admin → Extensions → Template Manager
  2. Select rt_oculus
  3. Press Make Default
Image

Image
 

RocketLauncher Instructions

We always recommend installing a RocketLauncher first to trial and understand the template more effectively. It must be installed as new, and not over an existing Joomla install.


Step 1 - Upload

  • Download the RocketLauncher
  • Unzip the file
  • Upload the created folder to your server

Note: You can upload all the files via FTP, or use cPanel or SSH to upload the zip and unzip directly onto the server. Enquire with your hosting provider.


Step 2 - Installation

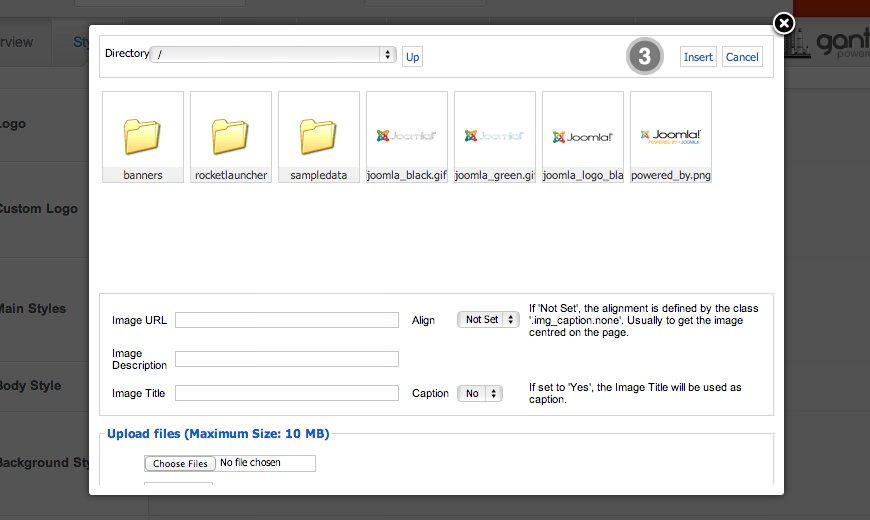
1. The Logo Picker

  1. Enable Logo and set to Custom at Admin → Extensions → Templates Manager → rt_oculus → Features.
  2. Set Logo Picker to either RokGallery or MediaManager.
  3. Select your logo, Insert and Save

Logo Panel
 

Select Logo
 

2. Manual Change

  1. Enable Logo and set Type to Oculus.
  2. Upload logo.png and logo-icon.png to the
    /templates/rt_oculus/images/logo/ directory
  3. Clear your browser cache and refresh.

If you cannot see your new logo, ensure you have uploaded it to the right directory and the directory permissions are writeable. Enquire with your hosting provider.

Download Sources Here

Popular News

  • 1
  • 2

Popular Features

  • RokSprocket
  • Menu
  • Styling

Content Extension

image

Multiple layout types available: Headlines, Mosaic, Tabs, Features, Lists, & Strips.

Includes an extension administrative UI.

Read More

RokNavMenu

image

Two configurable menu systems: Dropdown Menu and SplitMenu.

Dropdown Menu is CSS based.

Read More

Individualize

image

Choose from a selection of configurable preset style variations.

Module class suffixes are also available.

Read More

Gantry Extras

  • Grid System +

    The layout is split into adjustable grids, in groups of 6. Read More
  • Custom Admin +

    An advanced and intuitive administrative interface. Read More
  • Features +

    A set of standard features, which are customizable. Read More
  • 1
  • 2

Oculus Demo

RocketLauncher installs a replica of the demo.

image

Read More

Our Users

Basic K2 style support is available with this template.

image
image
image
image
image
image